WhatsApp Call

45, Unit-3, Kharvel Nagar, Bhubaneswar, 751001

Monday - Friday 08:00 AM-08:00 PM

9776417248, 9583634399

Water Proofing

  • Services
  • Water Proofing

Waterproofing Works

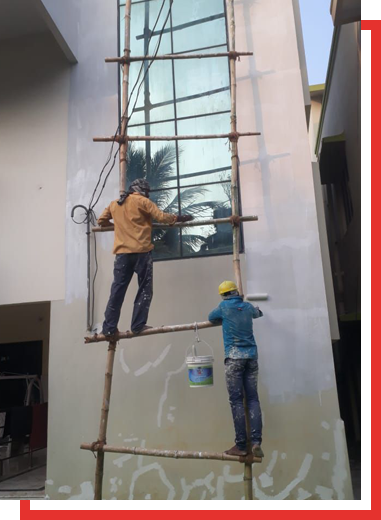
Building Ka Doctor is the premier waterproofing company that has been providing quality service for more than a decade. Implementing skill and experience makes the home completely free from any type of seepages and makes the home reinforced against any type of adverse weather condition. No matter whether you have an existing home or constructing a new one, Building Ka Doctor can assure quality waterproofing treatment for your home.

Terrace/Roof Waterproofing

Many homeowners today experience leakage and seepage in their roofs. The main causes of roof seepage are; improper slopes clogged pipes and cracks and damage to the roof. They hold the water in the cracks or where the slopes are not thoroughly done and then that water penetrates the roof slowly causing leakage. A terrace made up of tiles or chine chips has numerous joints and if the joints are not filled properly, they lead to water leakage. A waterproofing treatment is needed to get rid of this issue.

Waterproofing treatment can be done on the newly constructed roof as well. It will enhance the life and durability of the roof.

Steps for waterproofing the existing terrace

  • Surface preparation
    Surface preparation is the initial step to making the terrace ready for the waterproofing treatment. Most of the existing terraces have algae/fungus, oil, or grease and they need to be removed first. Our experts use a pressure washer to remove them.
  • Sealing the outlets and projections
    In this step, the rainwater outlet and other open holes get sealed using proper material to ensure, no liquid or water is getting into the pipes during the waterproofing treatment.
  • Applying primer
    Primer is just like the bonding agent that helps to stick the coating and the surface. It ensures better adhesion and enhances the durability of the applied coating over it. Additionally, it provides additional protection to the surface.
  • Applying base coat
    Applying base coast is crucial in this process. It mainly creates a foundation for the coating that absorbs any type of movement shocks that may be created either by surface or by any external movement.
  • Applying reinforcement
    Adding reinforcement in this procedure means adding life to the entire coating system. It helps to enhance the durability and validity of the coat.
  • Intermediate coat
    Intermediate coats serve different objectives including better insulation and isolation of the system. It also helps to protect the coating system from the adverse condition.
  • Applying topcoat
    Topcoat mainly applies on the top of all these layers. It is packed with several properties including anti-abrasive, UV stable, anti-static, solar reflective, and aesthetically appealing.

Advantages of roof/terrace waterproofing

  • Improves the durability of the roof
  • Reduces the potential risk of roof damage due to seepage
  • Keeps the rooms cool by reflecting the sunray
  • Prevents any possibility of health issues caused due to the growth of mold and mildew
  • Increases the quality and life of interior color and furniture attached to walls and roof
Waterproofing

Kitchen Wet Areas Waterproofing

The kitchen is a vital part of the home. This is one of the most used areas of the home. Since it has to deal with both cold and warm water, the surface gets weakened early and water gets into the tiles and then to the walls. As a result, the floor and the associated wall get damaged prematurely. This is the reason, waterproofing the kitchen wet areas is the need of the hour.

Waterproofing

Steps to waterproof the kitchen wet areas

  • Cleaning the floor
    Cleaning the floor is the initial step you have to do before going to waterproof the kitchen. Sweep it thoroughly and open the windows in the room or any ventilation hatches for proper airflow.
  • Applying floor primer
    Most of the kitchen subfloors are made of concrete, plywood, or OSB. So, we apply floor primers that work on multiple surfaces. Our experts pour the primer on the floor and start spreading it over the entire floor. Primer needs two to four hours in the daytime for drying.
  • Applying waterproof caulk
    Now time to apply a sealant to the subfloor. It helps to seal the gap or cracks at the joint of the floor and the wall. A caulk gun is used for this process. If there are any cracks on the floor, the sealant is used to ensure no leakage of water beneath the subfloor.
  • Applying waterproof sealant
    Before going to apply the membrane our workers mask the tape and apply it to the bottom of the wall around the room to prevent it from being coated. After doing this, they apply the sealant to the entire floor with the help of a sponge mop. To apply the sealant properly, they start applying it from the corner of the door and work according to the way back from left to right.
  • Applying waterproof membrane
    Applying a waterproof membrane is the last step of this process. We apply it after the sealant has dried completely by laying the sheets and we ensure that, there are no gaps left between the strips of the floor and the wall.
  • Installing flooring
    After completion of all these steps, we do install the flooring and make sure that it is appealing more than before it was.

Advantages of waterproofing the kitchen wet areas

  • No more mold problems on the floor or wet areas of the kitchen
  • No fear of the pest infections due to moisture
  • No risk of the structural decay
  • Easy and comfortable to use the kitchen area
  • No chance of water clogging between the strips of the tile

Washroom/Bathroom Waterproofing

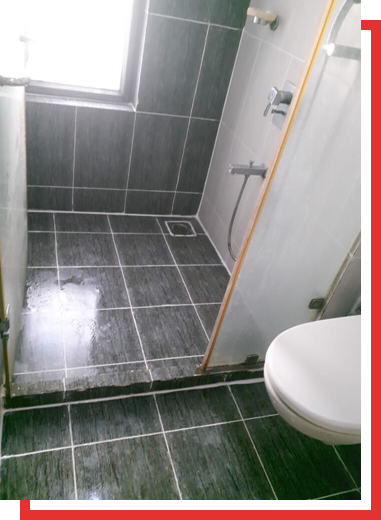
The bathroom is one of the most used rooms in the home. This is the most exposure space to moisture and if the bathroom is not treated thoroughly, it will cause serious damage to the health and the value of the home. This is the reason, experts suggest opting for professional waterproofing treatment to keep the bathroom safe from rising dampness, corrosion of plumbing, safeguarding the electric accessories, warping and rotting of timber floor and structure, and finally damage to the concrete floor.

We provide the waterproofing solution for both newly constructed and existing bathrooms.

Steps we follow for waterproofing the bathroom/washroom

  • Cleaning the bathroom floor
    Before starting the process, we clean the bathroom thoroughly to ensure the wet area is free from any dents or spots and ready to work on. We use various washing techniques like vacuum cleaners, pressure washing, and manual brush.
  • Applying the primer
    We apply the best quality primer to the floor and also to the walls up to the height of 20 to 30cm. From the wall to the entire floor, we cover the primer manually using a roller and brush.
  • Filling gaps with silicone
    We wait a few hours till the primer is dry and once it is done; we cover the gaps (the joining point of the wall and floor, around the vanity, near the shower and its base) with silicone tape. We left the room in this stage for 24 hours to dry perfectly.
  • Applying waterproofing agent to the corner and walls
    We apply a waterproofing agent to all the corners and walls of the bathroom with the help of a roller or brush. We apply that on the wall and floor where the primer has been applied before.
  • Adding waterproofing membrane
    We apply a waterproof membrane to the wall along with the cracks in the wall. To ensure it is applied on the entire floor, we first cut that with appropriate lengths and place it into the perfect position and finally, apply the waterproofing agent to ensure it has been stuck thoroughly.
  • Applying the waterproof agent to the rest of the floor
    After completing these steps, we apply the waterproof agent to the rest of the floor and left that to dry. This is the first coat.
  • Second coat after 24 hours of the first one
    We recommend a second coat for better results and to apply the second one, we wait for 24 hours to dry the first one completely. After applying the second coat we recommend our clients wait for 24 hours and then you can use the bathroom.

Advantages of washroom/bathroom waterproofing

  • No chance of leaking
  • No fear of damp and mold
  • Adequate insulation
  • Increases the property value
Waterproofing

Exterior and Interior Walls Waterproofing

After the roof, exterior walls are the most exposed part of the home to rain, snow, and sunlight. Over the years, after constant dealing with natural elements, the walls get weakened and the water then leakage from exterior walls to the interior causing a lot of damage including various health issues. This is the reason, it is crucial to go for waterproofing treatment for both interior and exterior walls.

Waterproofing

Steps we follow for making the exterior and interior walls waterproof

  • Cleaning the wall
    Cleaning both sides of the walls is the initial step in the waterproofing procedure. Our experts use the latest cleaning method to get rid of the dust, old color, and filth marks from the walls. To ensure this cleaning task is properly done, we first remove the water or drainage pipes and old field tiles from the wall.
  • Locating cracks and filling them up
    After cleaning, we look for the cracks and holes on both sides of the walls. We fill them up using liquid cement. If there are any cracks in the concrete structure, our workers fill that using the concrete and cement mixture.
  • Adding cement waterproofing sealer
    We apply cement waterproofing sealer to ensure the durability of the waterproofing. Our experts generally apply the waterproof paint sealer on the exterior walls.
  • Accurate waterproofing agent for the wall
    There are mainly two types of walls that need waterproofing treatment. One is the concrete wall and the second one is the silicate-based wall. We use a dissimilar waterproofer for these two types of walls. We also use a plaster waterproofing additive to strengthen the waterproofed walls.
  • Applying waterproofer
    We have a team of excellent workers who apply the water-proofer using a roller or brush on the walls. We apply multiple coats according to the demand of our clients.
  • Applying tar and membrane
    We apply a tar-based pitch to strengthen the layering. It will make the layer much more durable. After that, we also use heavy-duty plastic or rubber remembrance for the waterproofing. In this way, the walls get reinforced to withstand wind, rain, dust, and sunrays.

Advantages of wall waterproofing

  • No chance of leakage
  • No damage to the accessories attached to the wall
  • The robust and strengthened wall can secure the home from various potential natural threats
  • Aesthetically pleasing
  • No need to apply color over the wall
  • Increase the market value of the property

Epoxy Waterproof Tile Grouts

Epoxy grout is the best solution for homeowners who want a waterproof solution for their homes. Since epoxy grout is less porous compared to regular grout, it prevents the water from leakage beneath its surface. Epoxy grout can withstand extreme environments without staining or shrinking. This type of grout is resilient, durable, and sturdy.

Steps we follow for epoxy waterproof tile grouts

  • Preparing the area to install
    We identify and prepare the area where the tiles are going to be installed. We clean them and make sure that there is plenty of space available for our workers to work freely. Epoxy grout is best to install at room temperature and we ensure proper light and ventilation of fresh air to the working area.
  • Arranging the required tools
    Arranging the tools is the second most crucial thing to do for installing tile grouts. We use a grout mixture, trowel, electric drill with a mixing blade, and a scrub pad. These are the essential tools and we keep them handy.
  • Mixing the grout
    Mixing the grout is a very essential part of installing grouts. We mix paste and the catalyst and blend that using the mixing blade to ensure that, the mixture is completely ready. Before the application, we mix the blend with a trowel manually to ensure that, the mixture is soft, smooth, and consistent.
  • Applying the grout
    Our experts apply the grout using a rubber float and remove the excess using the same. It helps to plan the surface without any additional bumps or holes.
  • Cleaning the grout
    After applying the grout, we clean and finish that thoroughly. This step is done when the grout is wet and we do this quickly before the grout gets hardened. First, we sprinkle normal water on the grouted surface and smooth that using the scrub pad. After that, we use a hydro sponge to finalize the cleaning. If still there is any haze, we polish off that using a piece of cloth.

Advantages of epoxy waterproof tile grout

  • No chance of leakage of liquid substances including water, oil, or chemical
  • No tarp of the water in the joint of the tiles
  • Visually pleasing
  • Easy to clean and last longer than others
Waterproofing

Let's Make Your Dream House With Our Professionals


cheap air max|cheap air jordans|pompy wtryskowe|cheap huarache shoes| bombas inyeccion|cheap jordans|cheap sneakers|wholesale jordans|cheap china jordans|cheap wholesale jordans|cheap jordans|wholesale jewelry china